My Print Jobs
If you have printed something to the print@me queue – i.e. the system does not print the job immediately but stores it temporarily until you request printing – you will see your print jobs in the list of print jobs.
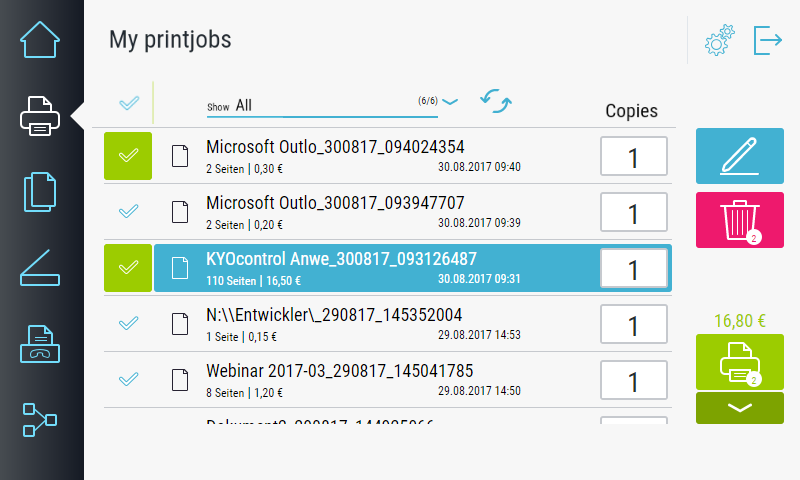
The My Print Jobs menu shows you your print jobs. The print jobs are sorted chronologically, with the most recent print job at the top. If you have more print jobs than will fit into the view on the device display, swipe up or down in the list of print jobs to see more print jobs.
You can restrict the view of the print jobs to get a better overview of your print jobs.
To do so, press the drop-down list above the list of print jobs on the device and select the desired restriction. At the end of the line you will see how many print jobs of the total number of jobs you will see e.g. 3/7 (3 of 7).
- All
- Jobs From Today
- Jobs Of Last 7 Days
- Color Print Jobs
- B/W Print Jobs
With the print preview, the first page of the printed document is shown on the device display - this helps to easily distinguish print jobs with similar names. Press the file icon  in front of the print job name.
A preview of print jobs is not always available, for example, if the print job was not sent in PCL/XL format, was stored encrypted, or is an e-mail or WebPrint. The print preview can also be completely deactivated, see Print job analysis module.
 You can modify some properties of the marked (line of the print job highlighted in color) print job, e.g. to make it printable on the desired device. Pressing the Edit button takes you to the Editing Print Jobs dialog.
 The Delete button deletes all selected print jobs. The number of print jobs to be deleted is shown in a small font on the button.
Deleting the print jobs is done immediately and without prompting. The print jobs cannot be restored.
Print jobs have a configurable maximum runtime. After this time they are deleted automatically, see Workflow Settings.
The number of copies is preset with the value transmitted by the driver (number of copies is usually configurable in the driver). To change the number of copies of a print job, press in the number field at the end of the line. Enter the desired number of copies. The changed number is saved immediately and is still available after logging out (without having previously printed) and can be viewed and changed on the device and in the WebClient.
 The Print button prints all selected print jobs. The number of print jobs to be printed is displayed in small numbers on the button. After printing, the print job is deleted.
The menu which opens when you press the arrow on the print button provides you with further printing options:
- Print all: Prints all print jobs in the list that can be printed by the device. The number is shown in parentheses.
- Print selection: Prints all selected print jobs. This is the standard function of the Print button.
- Print and hold: All selected print jobs are printed, but they are not deleted after printing. This allows you to print them more than once. If the module is missing in the print workflow, the button has no function, see Print and hold module.
The display of costs shows the costs according to the price list assigned to the device, see Price Lists. The costs are displayed for each print job right after the number of pages. The total cost of the selected print jobs is displayed above the Print button and in the menu for the other print functions.
The display of the costs can be deactivated, see Display Of Costs And Credits.
 The Settings button takes you to your personal settings, where you can set the language. With some device manufacturers, you can get there directly; with some, a menu opens which gives you to access the settings. In this menu, the status dialog of the device can also be called up using Device Status.
After logging in, the device will automatically switch to the language you have set. Depending on the system settings, you also have the option here of linking a transponder card with your user, see Card learning.
If you have the user right Use Device Function, you can close the interface of IQ4docs and go to the device interface (this is the same as the function Device Function in the Copy area, however, depending on the license of the device, the copy dialog is not always displayed).
This function is used to call up the Status device interface, in which print jobs can be viewed and paused. Technicians can also access the technician menu of the device via this menu.
If the device has to be made available with full rights for a technician, the maintenance password can be entered via this menu item, see also Unlock Device With Service Password.
If you have administrator rights to the device (see User List), you can open another dialog by pressing the Settings button for a longer time. This dialog provides you with information about the device and about the settings and versions of the Embedded Client and DeviceService. Additionally you have the following buttons:
- Save log file to USB: The IQ4docs log file is written to a USB medium plugged into the device (log_<timestamp>_<device_serial_number>.log, e.g. log_20171115_160457_W2S6801632.log). The log file can have a maximum size of 2 MB. The write operation is started immediately when the button is pressed and is also ended without a message (takes only a few seconds).
- Close application window: Closes the Embedded Client interface (displays the interface of the device).
 With some device manufacturers, pressing this icon activates the device's energy-saving mode and turns off the display. If you are currently logged in, you will be logged out by this process.
 To log out, you can press the Logout icon located in the upper right corner of each dialog. This will take you back to the default login screen (which one that is can be set under Set authentication methods).